
I shared on Instagram my plans for a makeover of our guest bedroom. We decorated and furnished the room as part of the One Room Challenge back in 2017. Since then, my style has evolved. At the time I was having a boho moment and we piecemealed what we had to furnish the room. Now it’s time for a little refresh! I want the room to feel less playful and more grown-up. I’m going for a collected farmhouse vibe with some drama in the paint. I’m considering a dark or bold color. A guest room is a great space to have some fun in. I am also considering a simple wall treatment, perhaps a chair or picture rail and/or crown molding.
My Design Process
It’s very early in the design process and I have only nailed down a couple of pieces for the room so I’m going to talk a little about my design process. This is the gist of how I approach designing a new space for myself or for a client.
Step 1: Ask yourself how you want the space to feel.
The first question I always consider is how I want the room to feel. For the guest room, I want it to feel collected, warm, welcoming, cozy, perhaps moody, and have a farmhouse vibe.
Step 2: Develop a living mood board for the room.
Very early in the process, I start a mood board for the room. I use photoshop but you can do this in Microsoft word or whatever is easiest for you. Some kind of visual representation of the furniture and decor and how it all works together is so important. It can help you refine the room and make decisions. For me, it helps me stay on track with the original vision of the room too.
Step 3: Seek inspiration.
The next thing I do is seek inspiration. I head to Pinterest to review pins I’ve saved over the years. I’m searching for rooms that have the same overall feel I’m going for. I may also look to some of my favorite sources of design, magazines, catalogs, search hash tags on Instagram, etc.
Here are a few rooms that are inspiring the vibe I’m going for in our guest room:
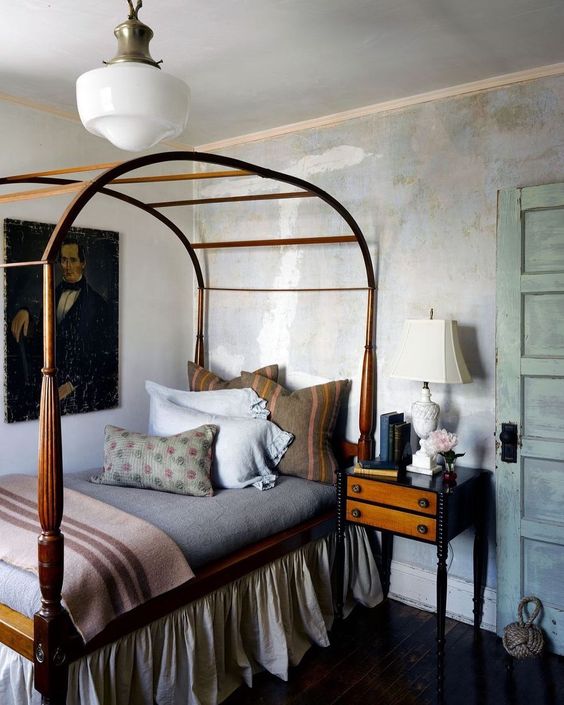
via kenfulk
I love the old-world feel of this room and the unique, collected furniture and decor.
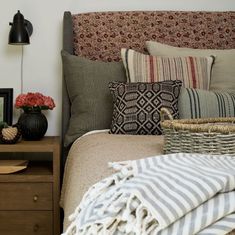
via domovshop
This one is a great example of a layered textile look that I am digging.
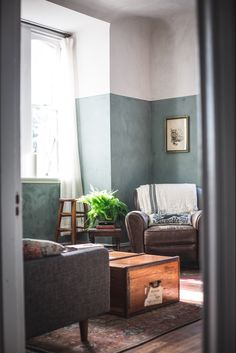
via airbnb
Although this one isn’t a bedroom, I love the two-toned walls. I’m considering something like this in our guest room with trim.
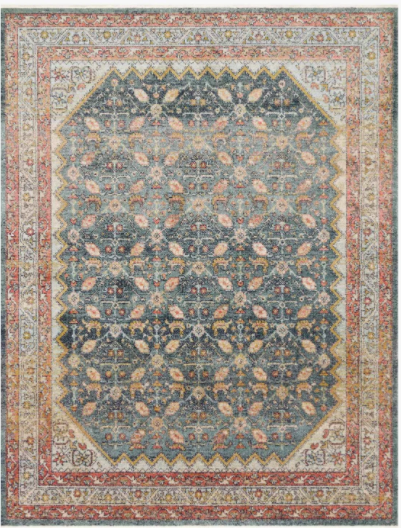
Maybe there is a piece of decor that you have your heart set on that can inspire the rest of the room whether it be art, a rug, wallpaper, or a textile. When I am starting fresh in a bedroom I prefer to start with a rug. For our guest bedroom, I am using this gorgeous patterned rug from the Loloi x Magnolia collaboration. Now that I’ve nailed down a rug, I can pull from the colors in the pattern to inspire the color scheme of the space.
Step 4: Choose large furnishings.
The next thing I like to do is choose large pieces of furniture. For a bedroom, I typically start with the bed. For the guest room, it worked out that I chose an armoire first. I saw it on Facebook marketplace and had to have it. It is the perfect size to conceal the TV we keep in the room, it has a vintage, farmhouse vibe and a good wood tone in case we don’t refinish or paint it.

I considered keeping the bed we have and upholstering it in a vintage fabric but I was also drawn to the idea of a 4-poster bed with turned posts. In my search, I stumbled upon this bed and fell in love. I found it on sale for a great deal and pulled the trigger.
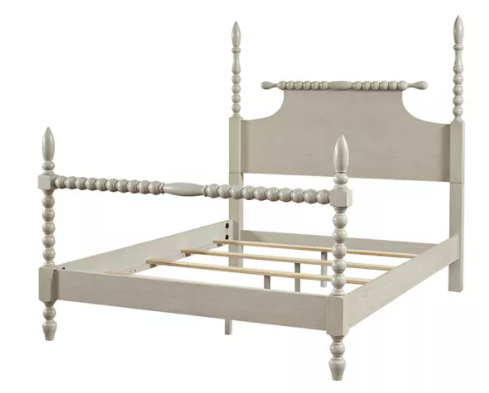
It feels very farmhouse to me and I can’t wait to see it in person.
Step 5: Sample and select a wall color.
There are times when the wall color comes first and that’s perfectly fine. However, if you want to put a non-neutral color on the walls and don’t know what color, it can make color selection a little easier if you already have a rug and large furnishings. Now that I have chosen a rug, bed, and armoire, I can draw wall color ideas from the rug while considering the way the bed and armoire will look against it. As always, pick a few swatches and sample them on your walls.
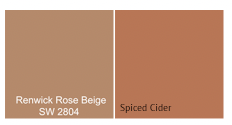
Although it’s way too early to pinpoint a paint color for our room, these are a couple I initially pulled as potentials.
Step 6: Finalize lighting, decor and accessories.
The last and in my opinion the most fun, is finalizing all the decor and accessories. Lighting, bedding, art, decor and accessories are icing on the cake. I typically save lighting for last because it’s the thing I struggle with the most. But after you have the large furniture in place and wall color selected, it’s much easier to fill in the gaps and edit the space with the little things that make a big impact.

2 Responses
I can’t wait to see how it turns out!! And thanks for sharing the details of your design process. I think I need to start making mood board so I can stay focused too! 🙂
Thank you, Mal! The mood board definitely helps!!